Saturday, April 9, 2016

9 - Second Floor, Window Framing, Finish the Concrete Floor

On July 5th, we still had the crane and wanted to take full advantage of using it to do some heavy lifting before we had to return it on Monday.  We used the crane to lift sheets of Advantech up to create the base flooring for the second story.  My wife operated the crane, and I started nailing the sheets down.


One sheet at a time, the flooring started to fall into place.


Done!  Now onto the next phase of construction, framing the upstairs walls. 


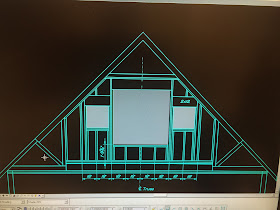
Since we are deviating from the original construction plans to make our project look more "barndominium" and less "garage with upstairs apartment," I asked my wife to sketch out how she wanted the windows to be placed.  She drew this on some scrap wood, including the dimentions for customs windows we would order later:


I sent that sketch to my brother-in-law, who designed the exact schematics for how to construct the wall, and then he sent the design back to my phone.  I started to build it.


And that, my friends, is how it's done. 


On July 6th, we woke up early to drive back to Waterville to return the crane.  Then we headed back to watch the concrete pad for the garage floor get poured.   The crew was efficient, professional, and did an outstanding job.


After screeding it, they let us put our handprints in it and then power trowelled the rest of the surface until it was smooth and then sat back for lunch to let the concrete harden a little more.


Finally, they cut expansion joints by cutting one down the middle and two from side to side dividing it lengthwise in thirds.


They were even nice enough to help us put up the remaining large pieces of wall sheathing while we waited for the concrete to dry.  Really nice group of men. 


While we were chatting with the crew, one of the men asked what we were doing for the roof.  We answered that we were planning to install a metal roof.  He asked if we were planning to do the work ourselves, or hire it out.  We said we hadn't hired anyone one to do it, and it was looking like we'd have to do the job ourselves, a notion we weren't looking forward to.  He said he knew a guy who did roofs who had a crew.  We jumped on that!  We asked him to call his buddy.  Within minutes, we described the work we wanted done, the materials we would be using and had on hand, gave him the roof and pitch dimenssions, and he gave us a price estimate that we were comfortable with. We hired him on the spot and he was going to fit into our schedule!


8 - Finishing the Truss Install


4th of July!  We woke up really early so we could get over to install a few more trusses before the town's annual 4th of July parade.  We started installing more trusses before 6am, and really started cranking them out.  Again, it was all hands on deck with my folks and brother-in-law helping out while my wife operated the crane.  We had two hours to get as much done as possible before a mandatory break.  We probably got another five trusses installed before taking a break to celebrate our great Country's birthday.


Our family really loves the 4th of July, what red-blooded American doesn't?  So my wife dressed up to ride in the neighbors float in the town's parade to throw candy out to the children in the audience.  Their float won first place, and my wife wore her tutu to finish up the truss work.  She and my step-mother joked about starting a new truss installation company call "Tutu Trusses."


Almost done!


With the final truss installed, it was time for some good ol' fashioned steak fajitas that my dad made on the smoker, cold beer, country music, fireworks, and some quality time with the family.


7 - Starting the Truss Install

Before installing the trusses, we needed to put up a few braces to secure the first truss to so it didn't fall backwards or forward.  Next we cut 2x4s into lengths to fashion braces we would install between each truss.  This not only helps makes sure the spacing is perfect--24 inches on center--but secures them to each other so they don't fall over.


We called Eagle Tool Rental in Waterville, Maine and rented a crane (it's probably more of a lift, but we're calling it a crane).  We got a great deal on renting the crane since it was 4th of July weekend.  We picked up the crane on Friday and kept it until Monday, and they only charged us for one day of rental because they were closed for the long weekend and no one else was going to be renting it. 


My wife was really excited to operate the crane--like SUPER EXCITED!


We picked up the crane around 4pm, and there was still plenty of daylight, so we got right to work.  My father and step-mother arrived on July 2nd to do some coastal sight seeing and help out on the project; my folks were excited to be there to see this construction and happy to be a part of the process as well.  By 6pm we had the first truss up in the air.  My wife used the crane to lift the trusses, and my brother-in-law, dad, and I used some guide ropes to help swing the trusses into place.  The first few took a little longer to get in place, but once we got the hang of it, we got a good rhythm going.


By 8pm we were ready for some food, a cold beer, a shower, and some rest.  With daylight quickly fading, we were able to install five trusses before calling it a day.


The next day was the 4th of July and we had a big day planned.

6 - Finishing Up the Framing

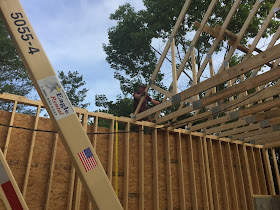
Once we got the floor base compacted by our excavator (afternoon of 2 July), we were able to finish framing out the side walls and added the front walls.


We also added the header for the garage door and the wall section above the header.  We could never have done this entire project without our brother-in-law.  There is nothing this man doesn't know how to do.


This is an awkward photo....walls up, installing door, and we get caught in a picture by my wife chatting and looking like we don't know what's going on....  This is never the case.


With walls and the front header up, it was time for the truss delivery.  Our trusses span 24 feet, and there are 19 of them at 24 inch spacing across the side walls to extend the 36 foot length of the structure.  The trusses have a 13-1/2 foot wide opening with knee walls at 52-1/2 inches, a ceiling at 90-1/2 inches high (7-1/2 feet) measuring 76-1/4 inches across.


A month before we planned to build, we sent a copy of our building plans to LaPointe Lumber, who then turned them over to Mainly Trusses, to custom build our trusses to adhere to Maine building code.  Mainly Trusses delivered our order right on schedule with them being dropped off on July 3rd.


Where do these trusses go?  They go up--on top of those walls.  Each truss weighed about 100 pounds.


It was coming together.


5 - Framing Walls

With the foundation walls cured, it was time to frame out the walls.  LaPointe Lumber delivered everything on time and even made a trip later to swap out some excess product that allowed us to upgrade the wall material.  The entire roof and wall boarding is 5/8-inch Advantech.  When it's all wrapped up and neatly stacked it desn't look like much does it? But that is all the materials we needed to build the first level of the barndominium.


We began assembling the 2x6 walls, starting at the rear of the structure, taking the stepped foundation into account to have 8-foot walls at the front end.
We framed up the back wall and the first and second steps of each side wall.  I will admit, calculating to be 16 inches on center is not my forte, so we did use a few extra studs because I refuse to rebuild things.  My brother-in-law kids me about my mistakes, but he is an excellant craftsman and he is truly the brains behind most of this project.  We don't build without his approval of the plan--you'll see more of that later.


With the rear wall sections framed up, we added some structural support by adding some of the wall sheathing (5/8" Advantech).  

Meanwhile, the only reason we do not have the rest of the walls assembled is because the excavator ran over schedule.  We didn't want the excavator's unprofessionalism to derail our entire plan, so we kept on doing as much work as we could.


As you can see, the excavator finally showed up days later to fill and compact the base for the garage floor.


After this visit, he didn't return for over two weeks--until after our vacation was over and we had already left.  He did about four hours of work on the day he returned and then called us to tell us he had completed his contractual obligations.  Convenient for him, since we weren't there to see what he had done.  Luckily, my brother-in-law had gone by and took a few pictures and sent them to us.  Needless to say, we were not happy with his work, or the state he left our property in.

Not only did we feel he hadn't completed the work we agreed to in contract, but he tried to squeeze us for more money.  He tried to claim that he did extra work, outside the scope of the contract, that we now owed him money for doing.  We found that to be a pretty unbelievable claim since he only showed up twice while we were on vacation, and was no where near close to having completed everything he was contracted to do, and there was no way he could have completed it in four hours.  Also, he never called us to ask permission to do "extra work," so we never agreed for him to do additional work outside the scope of the contract.  But the thing that really bothered us, was when he said that my wife and I had "good jobs" and we "could afford to pay more."  Sorry, but that's not how business works, and we will pay for the work that was actually done, not what he thinks we should be able to afford.

Moving on . . . We still had framing to complete.

Thursday, April 7, 2016

4 - Excavation and Foundation


In early June, our earthwork contractor started digging the foundation out and extending the driveway.   We chose a local contractor after talking to a few people we knew who had used his services for other projects.  Our plan was to have all of the earthwork done before the end of June.


The excavation would involve extending the driveway about 80 yards further into the property and digging the down 12" to lay different layers of material to allow for drainage.  Apparently the ground in this area of the property is one big gravel pit, and it drains exceptionally well.  The driveway would be brought up to alevel of 2" above normal grade.


The excavator dug the foundation out for footers to support a 24'x36' structure.


The concrete contractor poured 8 inch by 16 inch footings with 1/2 inch pins every 4 feet.  The walls are 8 inches thick with two rows of steel reinforcement and walls at 5 feet high, stepping the foundation walls to accomodate the grade.  At this point, the excavator was running behind schedule.  The concrete job was planned to conclude by the end of June and the footers were only poured on the 26th.


There are two steps to the side walls, the first is 16 inches and the second step is 20 inches for a total of 36.  The floor would be poured later at 4 inches thick with fiber mesh reinforcement and swacut expansion joints.  The walls were formed up and poured on June 29th.


To backfill the foundation walls, fill was compacted and brought to level so the concrete floor could be poured at a later date on the inside.  The excavator was slowing the project down, starting work late in the morning and not working very long in the day.  By June 30th we were supposed to be able to frame up the walls.  We had to wait until the excavator filled in around the foundation walls, a job he never totally completed until after we had the entire structure built up--and even then it wasn't a satisfactory job.  We had to correct it ourselves later. 


At this point, even though there was a huge ditch that the excavator never filled in on the back left side and large pile of fill dirt on the opposite front corner, we had to press forward to try and get back on schedule, since we did this all within 17 days of vacation time.  We had to start framing around the obstacles left in our way.

Sunday, April 3, 2016

3 - Planting New Roots: Site Clearing, Maintenance, and Fencing

Cold temps and lots of snow in early 2015 lingering through early April drove our schedule a bit, but that's expected up north. By mid-April, temperatures started to warm (30s-50s), rain came along to melt the snow, and in two weeks it was melting away and getting muddy.

Our plan was to start building our barndominium in 2015, a 24'x36', two-car garage with almost 500sqft of living space on the second floor loft.  We selected a building design from CADNW and purchased the plans in PDF with hard copies mailed to us, including a materials list.  This was a huge decision for us to settle on.  We looked at a lot of floorplans and went with a very simple layout that we could customize beyond the structural design.  We went with the CADNW plan because it gave us the most information, including a materials list, it the most freedom to customize while meeting building code requirements.

The old foundation is too close to the road for current building code.  Even if we built on that site, it would be a major undertaking to reconstitute a house on an old stone foundation that served as a base for two old structures that burned down in the past 70 years, so we planned to take the driveway back into the property about another 80 yards.

Will it have electricity?  Sort of...we will run the wiring in the new structure eventually, but we will have to run a new line from the road underground back to the house and don't have any plans to do that immediately.  We do have a generator for temporary power now and it can be used for emergency use later. 

Will it have running water and sewage? Again, not at first.  We will also have to run the existing well line underground (currently located near the road) back to the new site and we have to put in a new septic system because the old one near the old foundation is probably as old as the old house was. 

So what's the plan? We plan on using a composting toilet and bottled water.  Interestingly, there is a fresh water spring on the property and rain is usually not a problem.  We also plan to build an outdoor shower, consisting of a combination of rain barrel collection and a pump-supplied receptacle.

For our April projects we accomplished the following:
  1. Met with excavation contractor to go over work needed for extending the driveway and digging out the foundation.
  2. Raked out all underbrush and juniper bushes from pad and future yard site.
  3. Cut down trees in and around pad site and driveway.  We also cut down any trees that pose a future threat of falling on the new house due to a weak root system, dead or otherwise unhealthy, and some that were just unsightly.
  4. Installed split rail fencing from north end of property to a point past the driveway along road frontage.
  5. Chipped and burned brush from cutting last September and this project's cutting/clearing work.
  6. Sprayed brush killer on blackberry, raspberry, and sumac.
  7. Staked out the new driveway and foundation pad site.
The land was still heavily forested, so we had to clear cut an area for the foundation and extend the existing driveway back about 80 yards.  We purchased a Ratchet Rake for the tractor bucket to help tear unwanted vegetation and rocks from the ground and perform a rough grading of the driveway.


The tractor was bought by my wife's late father years ago and is about 30 years old. This tractor is a workhorse and is still in great condition. The family has been good about maintenance, however some things can't be prevented. As my wife was starting to fill in a deep depression in the yard caused by the previous owner, the arm on the bucket gave way--there was already a stress fracture and it suffered a clean break straight through.


Our brother-in-law knew a welder, so the next day we took the bucket in for repair.  A slight setback, but we were able to use the tractor on other projects, like installing fencing along the road frontage.

With our brother-in-law's help operating the tractor, using the post hole digger we purchased from Tractor Supply Company (TSC) we made short work of the fencing, installing over 220 feet of split rail fence.


We also purchased a gate from TSC to control vehicle access to our property.  We had trespasser problems twice last year, and yes we caught them on camera.

After meeting with the excavator at the beginning of our trip, we scheduled the earthwork for early June 2015.  The concrete team would follow up with their work and once the foundation walls were poured we started building.